
When you start this AFO the standard search screen is offered:
Just like for bibliographic records you can perform both a and a search. There are four options:
Search for an authority record in standard indexes, such as personal name, keyword etc.
Search for an authority record using record number. Of course you can only use this if you know the record number. You must choose the right database from the dropdown list.
The dropdown list contains the authority lists in use. This can be lists for: material types, author functions, languages, etc. These list authorities do not have a record as such, but just consist of code and optionally description. This tab only offers you the option to access the list and modify entries in the list.

Find search, a list of records is displayed in the Authorities found window.
Browse search, a list of words is displayed in the Authorities browse words found window.
Once you have performed your search, a result list will be displayed:
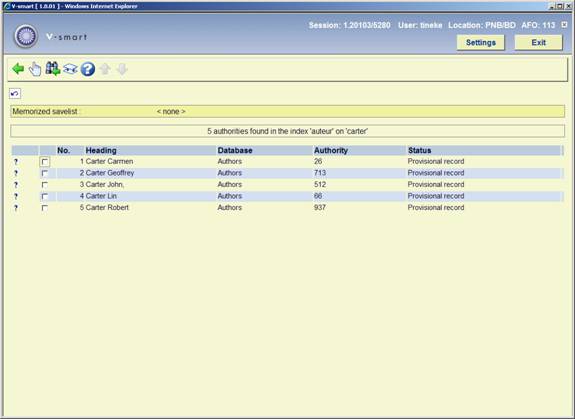
: Select a record and choose this option to select an authority record to edit or delete it. See section 113.3
: Choose this option to return to the search screen.
: Select a record and choose this option to merge the selected authority with another. See the help on AFO 115 (‘Record merging') for more information.
Cataloguers using the advanced search possibilities of the WebOPac (multiple criteria for example) with a professional profile will be able to "push" a record to Cataloguing without having to perform a search in AFO113.
When you click the button a new window will be opened to start a WebOpac session. Here you can perform a normal authority search.
Note
You can only search in the thesaurus. The thesaurus module requires a special implementation. Please contact Infor for more information.
Once you have selected a record, there is a button on the full record display screen.

When you click on this, you will return to your V-smart session, with the technical overview of the selected record on your screen.
Note
A parameter in the user settings of V-smart will determine which WebOpac profile will be activated from within AFO 113.
: Select a record and choose this option to select an authority record to edit or delete it. An overview screen will be displayed:
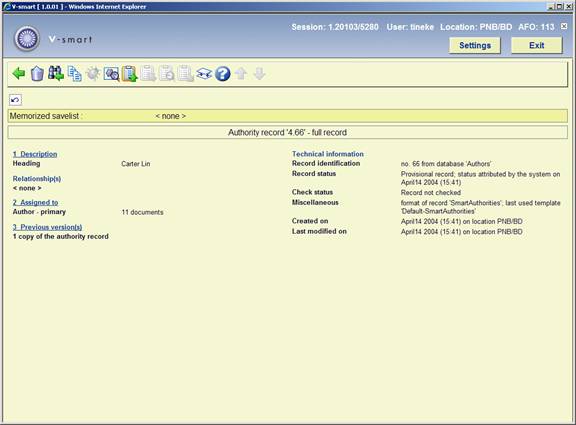
Description: A brief view of the contents of the record.
Relationship(s): Possible relationships with other authority records, like see and see-also references.
Assigned to: A counter of the number of records to which this authority has been assigned.
Previous version(s): It is possible to retain previous copies of the record after modifying it. See the Help for AFO 152, section Databases, for more information.
Technical information: Here you can see record number, record status, check status, record format, record template, entry date and last modification date.
Click the line above field Heading to modify the authority record. See section 113.3.1. Or click the line above field Assigned to to look at the associated bibliographic records. See section 113.3.2.
: Choose this option to delete the record. The system asks for confirmation.
Note
You can do this even when the authority record is associated with bibliographic records.
: Choose this option to return to the search screen.
: Choose this option to create a new authority record based on data in the current record. See section 133.3.3.
: Choose this option to show a list of errors (like conflicts in the chosen formats). This option is only active when there are errors.
: Choose this option to assign a different status to the record. You have a choice of: No special status, Incomplete record, Complete record, Approved record. You can also use this option to apply a different template.
: See section 113.3.4.
: See section 113.3.4.
: See section 113.3.4.
: See section 113.3.4.
: Select this option to merge the selected authority with another. See the help on AFO 115 (‘Record merging') for more information.
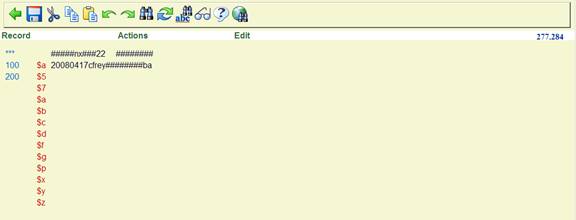
Click the line above field Heading to modify the authority record. The record editor will be displayed:

, and : these provide the standard Windows functionality for editing within the record.
and : Standard Windows functionality for undoing or redoing the last action.
: Search for a string within the record.
: Replace selected text.
: Search for another authority record. See also section 113.4.
: Presents the subfields of the chosen field in a form. For some subfields you can choose from dropdown lists.
: Provides additional help for the subfield where the cursor is positioned.
: contains the additional options Save, Save as template, Sort and Check.
: contains the options for Insert fields and subfields, Copy field and subfield and Delete field and subfield as well as Remove empty subfields.
: contains the additional options Insert line break, Insert non-filing mark.
Click the line above field Assigned to to look at the associated bibliographic records.

: See section 113.3.4.
: See section 113.3.4.
: Select a bibliographic record an then this option to look at the details of the bibliographic record.
: Choose this option to create a new authority record based on data in the current record. After selecting this option, an input form will be displayed:

Select the Database to which the record must be copied and an Import profile. Note that the profile must match with the target database.
If they do not match, the system will display a warning. If they do match, the system will prompt for confirmation of the copy action.
Authority management has the ability to move bibliographic records from one authority record to the other. This is done by using savelists as temporary data containers. Bibliographic records attached to authority record A are copied into a savelist, which can then be used to attach the record to authority record B, etc.
: Use this option to copy all the bibliographic records attached to the authority record to a savelist.
: Use this option to assign the current authority record to all bibliographic records in the current savelist.
: Use this option to view all the bibliographic records in the current savelist.
: Use this option to sever the link between the current authority record and all bibliographic records in the savelist.
: Select one of the associated bibliographic records and use this option to copy the selected record to a savelist.
: Use this option to add all the bibliographic records attached to the authority record to a savelist.
Note however that this ability still has limitations. You should be aware that the function as described here only works while you remain within authority management. In other words: the savelists only serve as temporary data containers within authority management. Once you leave AFO 113, vital, session related information is lost and you cannot proceed with the created savelists and still expect correct results.
Note
As described in this paragraph you should never leave the authority management function (AFO 113) during the process of moving bibliographic records from one authority record to another, using savelists as temporary containers. If you do this, the move will not be processed correctly.
When you start this AFO the standard search screen is offered:

On the Standard tab, click on . You will be presented with an input form:

Database: Choose the correct database from the dropdown list. Each type of authority heading (personal name, topical keyword, etc.) has its own database. See the Help for AFO 152, section Databases, for more information.
Template: Choose the correct template from the dropdown list. Each type of authority heading (personal name, topical keyword, etc.) can have its own template, with different fields defined. See the Help for AFO 154 – Template management for authority records, for more information.
After clicking , you will be presented with the record editor:
See section 133.3.1 for more information about the fields and options on this screen.
The bibliographic record can have several fields that are controlled by authority records. An example is the Personal name Tag 100$a.
You can search for an authority record in the Record editor, and either insert it in the field, or replace the existing data with another authority.
· Place the cursor in the tag 100.
- Click the icon on the toolbar, or
- Use function key F11, or
- Select Record - Search for…
The Searching for an authority to link to the current record window is displayed:
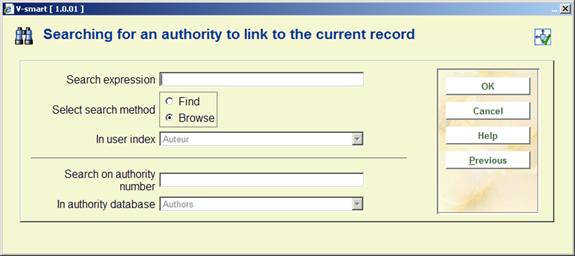
· Enter a term, such as author's last name, in the Search expression box
· Select a search method
· Select a user index (not always an active option)
· Select the authority database (not always an active option)
· Click .
The authorities found in the index ……….. form is displayed:

This displays all the authority records that match your search term.
· Highlight the authority that most closely matches the one you want.
· Click the button.
The Details for authority form is displayed:
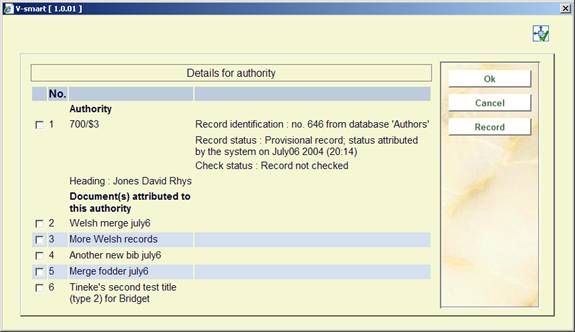
This shows the details for the authority and also a list records that link to this heading. The system displays up to 20 of the most recent records. From this list you can see whether the bibliographic record you are creating or editing is similar to those already catalogued.
To see the full details of an individual record:
· Highlight one of the titles and click the button
The system displays the full MARC21 record for that title, in read-only mode.
· Return to the authorities found for form
· Highlight the correct authority you want to select for your bibliographic record
· Click
The system inserts or replaces this authority in your record editor screen.
When displaying authority records during an authority record search (when editing bibliographic records) the system should have the ability to navigate to related records. This implies that the popup select list also has a “Navigate” button, so that the user can navigate through the authority file. This is especially relevant for thesauri.

The system supports a facility for matching of authorities.
The logic is as follows:
· a text string entered in an authority slave data field (in the bibliographic record) is matched with the existing authorities;
· if an exact match is found, the existing authority is selected;
· if no exact match is found, the system will look for a near match in the associated authority file. This implies that the system will refer to the authority records that “best matches” the normalised form of the text string that has been entered.
Note
This is only implemented for “author” type authorities.
You must set the parameter “Check on ‘near matches' [only authors] to Yes for each of the relevant authority databases in AFO 152.
Near match algorithm
The next table displays the algorithms that is implemented.
|
Input string |
Near match display |
Not included in near match display |
|
Van Geel, David |
Van Geel, D. Van Geel, D.J. Van Geel, D. Dwight Van Geel, David G. Van Geel, David H. Van Geel, Davide |
Van Geel, Dirk |
|
Van Geel, D. |
Van Geel, D. Van Geel, D.J. Van Geel, D. Dwight Van Geel, David G. Van Geel, David H. Van Geel, Davide Van Geel, Dirk |
|
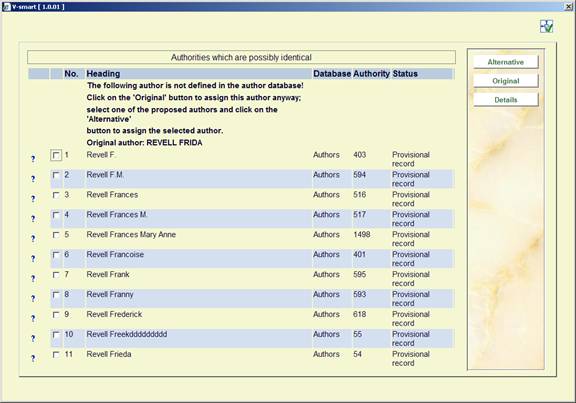
If the system detects that there is at least one authority that complies to the “near match algorithm” it will display a popup select list containing the following information:
· a warning message
· information about the authority wording as entered in the current bibliographic record
· one or more matching authorities
The system will allow the user to choose a matching authority, which will then lead to the display of authority information and related bibliographic records (as described in the previous section).
Note that this popup select list appears at either a close or a save of the bibliographic record, and that it will appear once for every authority record for which the “near match” algorithm is activated.
· Document control - Change History
|
Version |
Date |
Change description |
Author |
|
1.0 |
April 2008 |
Creation |
|
|
2.0 |
May 2010 |
New option to specify import profile; general overhaul |
|